Library
The Library is used to store files for use on your website. Some of the types of files that the library can store include:
- Articles: Articles you've created on your website and want to save for later use.
- Images: Art, logos, and photos in JPG, GIF, PNG, ICO, and BMP formats.
- Media: Flash and MP3's.
- Files: Documents that you can download, PDF, DOC, XLS, PPT, ZIP, and EPS.
Opening the Library
- Click on the Library button in the collapsible Administration panel.

- This will open the Library.

Folders
- The folders section of the library is made up of three primary folders. These can't be edited or deleted:
- My Content: These files are only available to the specific user who uploaded them.
- Site Content: These files are available to any user.
- Shared Content: This is only for parent sites. These files are available to any users, from both parent and child sites.
- Each of the primary folders contains four subfolders by default: Articles, Files, Images, and Media. You may delete or rename these subfolders if you choose, or you may create new subfolders below these.
- Right click on a folder to bring up commands to create a new subfolder, rename, move, or delete a folder.

Move a Folder to Another Location
- Right click on the folder you want to move, then select "move."
- A tree view of existing folders within the library will open.

- Select a destination folder (the folder you are moving will be placed underneath this folder). Click OK.
- Your folder will now appear underneath the destination folder that you selected.
Upload a File
Up to 20 files can be added at once, with a maximum file size of 25Mb. To upload a file, follow the steps below:
- Navigate to the folder where you want to upload a file.
- Click the Upload button to add a file from your computer.

- Locate the file from a folder on your computer. Select the file, then click Open.
- The file is added into the current folder.
Move or Copy a File to Another Folder
- Navigate to the folder containing the file that you wish to move or copy.
- Click and drag the file to the desired folder in the left-hand navigation panel. This will bring up a command prompt: Move Here/Copy Here.

- Select "Copy Here" if you wish to keep the file in the current folder and place a copy of it in the new folder.
- Select "Move Here" if you wish to remove the file from the current folder and place it in the new folder.
Additional File Functions
- To open additional file functions, right click on a file.
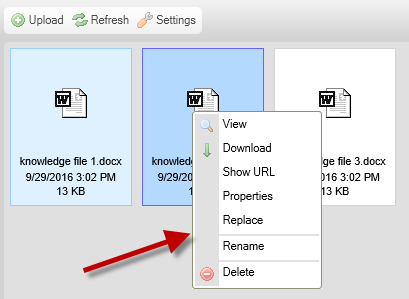
- Use the following functions to manage the file:
- View: Click to view the file.
- Download: Click to download copy of the file.
- Show URL: Click to show the file URL.
- Properties: Click to show the file properties (see section "Properties" below for more information).
- Replace: replaces a file with a new version of the file (see section "Replace a File" below for more information).
- Rename: Click to rename the file, however extension (.doc, .png, etc.) should not be changed.
- Delete: Click to delete the file.
Properties

From the Properties window, you can view/edit the Display Name, as well as add keywords and/or description, useful when searching or categorizing files within Library folders.
INTRANETS ONLY: For organizations (parent and child sites) that are designated as Intranet (pages and library files are only viewable after entering valid credentials) rather than Public (pages and library files are viewable as long as you have the URL), there is a checkbox that allows you to designate a file as public.
When "The File Is Public" checkbox is enabled, a user is allowed to view the file via URL without the need to first enter valid credentials. Please note that this option does not apply to Image files, such as PNG, JPG or GIF.
Note: Direct links to files in the library that are not marked as public will not work from external programs, such as Microsoft Word or Excel.
Replace a File
The replace a file feature allows you to update a file in the library to the latest version, without changing the file's URL. This means that any links to the file you have added to your website will remain intact, and will download the updated version of the file.
- Right click on the file you would like to update.
- Select "Replace."

- Navigate to the file on your computer that you would like to replace it with, and double click on the file.
- The file will be updated.
Other Library Functions
- Refresh: Click the Refresh button to refresh the current folder. This ensures you have all the current files.

- Settings: Click on the Settings button

- Make any desired changes to the View, Display, and Sorting settings. Your changes will be automatically saved.

- Search: Type into the search field to search for a file in the current folder.